The Lost City of Ilgrave

11 posts / 0 new
Last post
The Great Hippo's picture
Offline
Namer
Joined: 2005-07-28
The Lost City of Ilgrave

Quote:
Last updated: 9-2-06
  • Adjusted zombie encounters.
  • Changed Excavation Site text.
  • Added Bugbear Burial Grounds.
8-31-06
  • Adjusted kobold ACs based on small-sized creatures and natural +1 AC bonus.
  • Added Widdershins Swamp map.
  • Toned Mugwop's encounter down.
  • Simplified Mugwop Village.
  • Added stat-blocks for all kobolds.
  • Changed Kobold Walloper.
  • Took out the #%$#$@ smilies.
  • Added Magda's House, and Blackwater (under Errata).
  • Lots of writing fixes (typos, grammar, redundancies, etc)

ILGRAVE

_____________________________

"Our city is dead. Our people are dead. We have become death. Stay away."

Legends are rich with tales of lost cities, abandoned by their people and filled with the wealth of fallen empires. For the bold and adventurous, such places offer an oppurtunity for fame and fortune that cannot be ignored. But not every lost city wants to be found.

Ilgrave is an introductory module for Planescape, intended for three to five PCs of 3rd level. Suggestions for adjusting the level requirement are included in each episode. It can be inserted into any normal campaign, and by the end, the PCs should at least be familiar with many of the concepts found in Planescape. Although not at all necessary, owning a copy of the Planar Handbook and a copy of the Manual of the Planes is recommended. Ilgrave is divided into several episodes, with each episode being a self-contained module.

The campaign begins as a fairly standard module, but shortly after the second episode it takes a sharp turn towards matters of planar importance. Whether or not you explain this to your PCs is something that's entirely up to you.

_____________________________

Episode 1: Widdershins Swamp

Synopsis
PCs will arrive in Widdershins Swamp searching for the entrance to Ilgrave. They must deal with the two warring tribes of kobolds while simultaneously attempting to extract the necessary information concerning the location of the entrance to the lost city. This can be accomplished through diplomacy, violence, or even skipping the kobolds all together and attempting to find the entrance on their own.

The next episode begins once the PCs have discovered the location of Ilgrave's entrance and set foot in the excavation site.

Hooks
Money is probably the primary motivation for any party searching for Ilgrave. PCs may have heard rumors of a city filled with treasure and magical items buried beneath Widdershins Swamp. There have also been reports of undead wandering around the swamps, harassing travelers.

A dwarven excavation team recently (for dwarves, this translates to 25 years ago) investigated the rumors of a buried city in Widdershins Swamp. Shortly after arriving, all contact was lost with the dwarves. If any of the PCs are dwarves, an emissary from dwarven lands may approach their party and request that the PCs investigate the matter themselves and bring back word of the excavation's eventual fate (offering in return a reward worth no more than 5,000 gold). Additionally, they may be approached by a private treasure-hunter who has heard of the city and wishes to 'sponsor' an investigation by the PCs--he's willing to finance an expedition (up to 1000 gold) in return for 10% off the top of whatever the PCs may find.

Regardless of whether they are hired by a treasure-hunter or are working for the dwarves, the PCs are made aware that the exact location of Ilgrave's entrance has been lost to history and that the only person who may know is an old ranger by the name of Bartleby who lives along the road in Widdershin Swamp. So long as they follow the road to Bartleby's cabin, the PCs should have no trouble finding the guide and asking him for directions to the entrance.

Background
Although the PCs are lead to believe that there is a lost city buried beneath Widdershins Swamp, the only thing they'll find is a dwarven excavation site. This is not the location of the fabled Ilgrave. It is, however, the location of a portal to Ilgrave.

Ilgrave is not on the Prime Material plane. The only reason anyone has come to know of it is because of dwarven records that date back several centuries detailing the existence of the portal, and trade that had been going on between the dwarves and the denizens of Ilgrave. After a few centuries, nothing came through the portal any more and the dwarves assumed Ilgrave had lost interest. Recently, undead have started emerging from the abandoned trading hub--which prompted the dwarves to send in an expeditionary team to see what had happened. The team was never heard from again.

PCs who can make a Knowledge (Planar) check (DC: 15) have heard of Ilgrave, and know that it was a city formed by a cabal of powerful Wizards who established it as a utopia for magic-users throughout the Planes. No one has heard anything about the city for quite a few centuries, however, and all known portals (besides the one in Widdershins Swamp) have either been closed or forgotten about. PCs who can make a Knowledge (History) check (DC: 20) are aware that the dwarves traded with wizards at one time through means of an underground fortress underneath Widdershins Swamp that has since been abandoned. When making this last check, dwarves get a +5 to their roll.

PCs who hope to enlist Bartleby's aid will discover that Bartleby has been killed only a few days prior to the adventure; his attempt to bring peace between the warring kobold tribes in the marshlands cost him his life at the hands of the Mugwop tribe. The PCs will have to deal with the kobolds if they wish to get the information they seek.

Part 1: Widdershins Swamp

Quote:
The pungent smell of sickly sweet decay is layered thickly about the marsh. A brownish-grey miasma of gases cuts off any sight beyond a few hundred feet, and low-hanging vines seem to drench the limbs of every tree. The trail you are now following is an old one, bludgeoned beneath the soles of a thousand travelers, with brambles nibbling tirelessly away at the edges of the road.

Although perhaps a bit more smelly than your average marsh, Widdershins Swamp is typical for wetlands. Most creatures here are fairly unaggressive, as the recent work of the Mugwop kobold tribe has forced many predators (such as the giant crocodiles) out of the region.

There are two kobold tribes within Widdershin Swamps: The Mugwop and the Widdershin. The Mugwop are a tribe of kobolds that broke off from the Widdershin, who have survived in the swamp for over three centuries, but have constantly been rife with tribal in-fighting. The break occurred after the arrival of Horace, a Lawful Good cleric who came to the Widdershin a year ago and started to successfully minister to the kobolds. With Horace's help, the Widdershin became far less savage and much more family-oriented. Some of the militaristic kobolds broke off and formed their own tribe, naming themselves after their leader (Mugwop). The Mugwop occupy the eastern swamplands, while the Widdershin occupy the western swamplands. Skirmishes sometimes occur between the two, but so far there has existed a delicate peace between the tribes. This peace is starting to break down thanks to the Mugwop.

Depending on where the PCs go first--if they venture off the road to the east, west, or go directly to Bartleby's cabin--they will encounter either the Mugwop or the Widdershin first.

There is a 10% chance every hour of the PCs encountering something from the following table. Additionally, you may simply roll or pick from the table below as you see fit to liven up the adventure's pace.

Table 1.1: Widdershins Swamp Encounters

D%.......Encounter..........Average EL.......Source
01-50....1d4+2 Kobolds......3................See Below
51-60....1d6+1 Zombies......2................See Below
61-65....1 Wight............3................Monsterous Manual
66-90....1 Bugbear Zombie...2................See Below
91-100...1 Crocodile........2................Monsterous Manual

Quote:
Kobold Warrior (CR 1/2) LN/LE (see text) small Humanoid (reptilian), Level 1 Kobold Warrior Init +2; Senses darkvision 60 ft., Listen +0, Spot +0 Languages Kobold _____________________________

AC 16 (leather armor), touch 13, flatfooted 13
HP 8 (1 HD)
Fort +2, Ref +2, Will +0
_____________________________

Spd 30 ft.
Attacks Spear (+0) (1d6-1/x2), Short-Bow (+3) (1d6-1/x2)
Base Atk +1; Grp -4
_____________________________

Abilities Str: 8, Dex 14, Con 10, Int 8, Wis 9, Cha 8
Feats Dodge
Skills Survival +3
Possessions short bow, 10 arrows, spear, leather armor

Depending on where the kobolds are encountered, they will either be part of the Widdershin tribe (Lawful Neutral) or the Mugwop tribe (Lawful Evil). Kobolds encountered along the road or to the east will be of the Widdershin tribe, while kobolds encountered to the west of the road will be Mugwop tribe.

Widdershin kobolds will be frightened of the adventurers and run almost immediately upon seeing them. Mugwop will also usually retreat from the adventurers, but if they outnumber the amount of PCs in the party, there is a 50% chance that they will attack. Whenever any of the kobolds retreat, they head directly to their main camp. Whenever fighting, both kobold tribes prefer to stay at range for as long as possible, pelting party members with arrows.

Zombies (CR 1/2)
As seen in the Monsterous Manual. These zombies are incredibly old, with many of them having been preserved by the swamp's gases. They attack on sight without provocation, and prefer to stay together in packs. Roll 1d4 to determine race (1 is dwarf, 2 or 3 is kobold, 4 is human). Upon killing any target, these zombies will drag their prey back to the Excavation Site. If PCs happen to find this information out, they may use it to follow the zombies back to the Excavation Site.

Bugbear Zombie (CR 2)
As seen in the Monsterous Manual. These zombies have not been emerging from the excavation site--instead, these zombies are the result of Magda (area 5) experimenting with an old Bugbear burial ground (area 6). Any PC who searches the Bugbear body may make a Search check (DC: 18) to notice that the corpse is infused with a strange, toxic oil-like substance. This substance is Blackwater, and will be discussed in detail later. PCs may take a sample of it if they have a vial or flask available. If a Bugbear manages to kill anything (including the PCs), it will attempt to drag the body back to area 5 (Magda's House) and put it into the pond there.
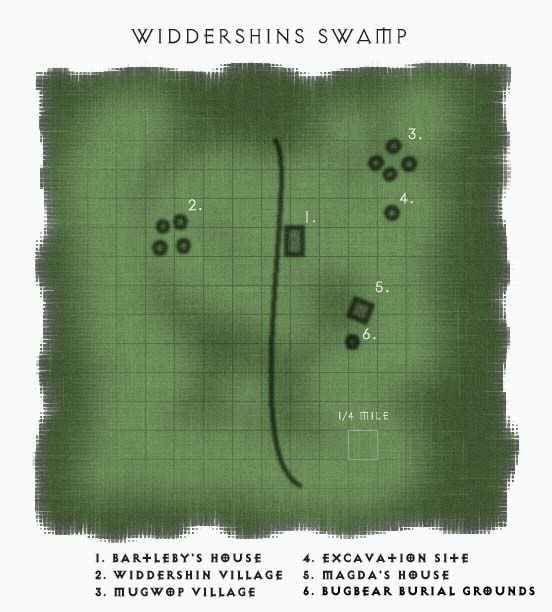

1. Bartleby's House
Quote:
This rather plain looking wooden cottage is constructed with whatever could be found on hand; brambles and vines tie unevenly chopped logs together into a single-story bungalow with a door that looks as if its been half-way eaten through. A hammock sits out back, and several kobold skulls hang above the door inside of a net.

Bartleby's cabin can be found far north on the road in Widdershins Swamp. PCs can make a Spot check (DC: 15) to notice that several freshly broken kobold arrows dot the area, some of which have dried blood on them. There is nothing else of any particular interest outside of the cabin. Once PCs enter the cabin, read the following text:

Quote:
The stench of rotting flesh is so strong that you nearly gag--the body of what you assume to be Bartleby lays on the floor, several arrows portruding from his chest. The ranger sits in the center of the near-claustrophobic room, where he apparently used an overturned table to provide some sort of cover from attackers who came in through the front door.

The room is filled with the survival gear one would expect of a hermit living in the woods--fishing equipment, hunting equipment, and an iron stove. It is all tightly packed into the room, leaving almost no space to manuever. Of particular interest, however, is a thick leather-bound notebook on the floor besides Bartleby's body.

The interior of Bartleby's house is 10x15 feet, with a ceiling 7 feet high. A successful Search check (DC: 15) will unearth 100 gold pieces buried beneath the floorboards of the room. Otherwise, PCs will find very little of interest here except a fair amount of rations and survival gear for Bartleby. Anyone familiar with kobolds will recognize the arrows almost immediately as kobold-made.

On his person, Bartleby has a plain long-sword, short-sword, a broken composite shortbow, and 10 +1 arrows left in his quiver. Insects and rot have turned his studded leather armor and other equipment useless.

Bartleby's notebook is a daily accounting of the struggle he went through to reunite the Mugwop and Widdershin tribes. It explains the reasons why the Widdershin and Mugwop split, going so far as to mention Horace and his work to pacify the Widdershin (something Bartleby greatly approved of) and Mugwop's decision to split off from the Widdershin. It gives a fairly precise location for both the Widdershin and Mugwop tribes. No mention is made of the location of the entrance of Ilgrave, though Bartleby makes note that Horace has become as familiar with the swamp as he has.

Bartleby's notebook additionally mentions Magda's house, giving a precise location of where it is. He explains how he has been investigating the Witch of the Marsh recently, ever since there has been an upsurge in the appearance of the undead, especially Bugbears.

Rangers or PCs with the Track feat can track the kobolds who attacked Bartleby with a Survival check (DC: 9). There are six sets of kobold tracks, and they all lead back to the Mugwop encampment. If the PCs do this, skip to Part 2: The Mugwop Tribe.

2. Widdershin Village

Quote:
Several huts build out of a combination of moss, dirt, brambles, and other assorted vegetation are arranged here in a wide circle that surrounds a fairly quaint-looking cottage cabin. Various kobolds--men, women, and children--peer out at you suspiciously as you arrive, many of them quickly ushering their families into their respective huts.

The Widdershin Village can be found three quarters of a mile to the west of Bartleby's house. The Widdershin tribe is fairly peaceful thanks to the efforts of Horace, the tribe's human cleric and de facto leader. Ever since he arrived to minister to the kobolds (many of whom have been impressed by his abilities to heal their sick and wounded), the tribe has moved from a Lawful Evil mindset to more of a Lawful Neutral mindset. Horace lives in the cottage alone, where he spends most of his time praying or interacting with the kobold tribe's various elders.

There are 35 kobolds in all in the Widdershin tribe; 15 Widdershin Warriors, 15 standard kobolds (as seen in the Monsterous Manual), and 5 Widdershin Adepts (who are under Horace's tutelage). In the unlikely incident that the PCs attack the tribe, keep in mind that Horace himself will come to their aid against the PCs. Both Horace and the kobolds are eager to resolve any difficulties through diplomatic means, but they will not hesitate to defend each other to the death if necessary.

Only the adept kobolds know enough common to talk with the PCs, and they will insist that they go see Horace immediately. All the other kobolds will be too afraid to initially communicate, even if the PCs know how to speak kobold.

Quote:
Widdershin Warrior (CR 1/2) LN small Humanoid (reptilian), Level 1 Kobold Warrior Init +2; Senses darkvision 60 ft., Listen +0, Spot +0 Languages Kobold _____________________________

AC 16 (leather armor), touch 13, flatfooted 13
HP 8 (1 HD)
Fort +2, Ref +2, Will +0
_____________________________

Spd 30 ft.
Attacks Spear (+0) (1d6-1/x2), Short-Bow (+3) (1d6-1/x2)
Base Atk +1; Grp -4
_____________________________

Abilities Str: 8, Dex 14, Con 10, Int 8, Wis 9, Cha 8
Feats Dodge
Skills Survival +3
Possessions short bow, 10 arrows, spear, leather armor

Quote:
Widdershin Adept (CR 1/2) LG small Humanoid (reptilian), Level 1 Kobold Adept Init +0; Senses darkvision 60 ft., Listen +2, Spot +2 Languages Kobold, Common _____________________________

AC 16 (leather armor), touch 13, flatfooted 13
HP 6 (1 HD)
Fort +0, Ref +0, Will +4
_____________________________

Spd 30 ft.
Attacks Dagger (-1) (1d4-1/x2)
Base Atk +0; Grp -5
Spells Known (CL 1st, 1d20+1 to overcome enemy SR):
0--Cure Minor Wounds, Purify Food and Drink, Light
1st--Cure Light Wounds, Bless

_____________________________

Abilities Str: 8, Dex 9, Con 10, Int 8, Wis 14, Cha 8
Feats Dodge
Skills Heal +5, Survival +3
Possessions dagger, leather armor

2a. Horace's Cabin

Quote:
The interior of this cabin professes a spartan-esque minimalism; absolutely everything is in its place, and there is absolutely nothing which is not integral. A simple table with a prayer book is at the center, with what few supplies its owner needs laid out next to it. A plain bedroll is unfurled in the north-western corner, and a holy symbol hangs upon the wall just above the doorway you have stepped through.

The cabin is a single-room home with a 10x10 foot interior and a ceiling seven feet high. Within this cabin is Horace Lightwater. He will be present here at about any time of day, and will want to speak with the PCs immediately. Additionally, a Search check (DC: 15) will find a leather bag of 75 gold behind the holy symbol on the wall.

Quote:
Horace Lightwater (CR 4) LG Medium Human, Level 4 Cleric (Good and Healing Domains) Init +0, Senses Listen +3, Spot +3 Languages Common, Kobold _____________________________

AC 16, touch 11, flat-footed 16
HP 28
Fort +6, Ref +1, Will +7
_____________________________

Spd 20 ft.
Attacks Morning Star (+4) (1d8+1/x2), Heavy Crossbow (+3/x2) 1d8
Base Atk +3; Grp +4
Spells Known (CL 4th, 1d20+4 to overcome enemy SR):
0--Create Water, Cure Minor Wounds(x2), Purify Food and Drink, Mending
1st--Protection from Evil, Cure Light Wounds(x3), Command
2nd--Aid, Bull's Strength, Cure Moderate Wounds, Restoration (Lesser)
_____________________________

Abilities Str 12, Dex 9, Con 14, Int 10, Wis 16, Cha 17
Feats Brew Potion, Self Sufficient, Diplomacy
Skills Diplomacy +11, Heal +4, Knowledge (History) +1, Concentration +4, Craft (Glass-Blowing) +1, Craft (Alchemy) +1
Possessions Ring of Protection +1, Breast-plate, Morning Star, 150 gp, masterwork masterwork glass-blowing tools, masterwork alchemist tools, heavy crossbow, 25 bolts, Potion of Cure Moderate Wounds (x2), Potion of Bull's Strength (x2)

Horace Lightwater is a young handsome ash-blonde hair cleric with a clear and charismatic voice who has come here to work with the kobolds and try to improve their lives. He has succeeded to some degree in converting the Widdershin kobolds from a violent tribe of self-destructive humanoids into an actual community. However, Mugwop has recently split away from the tribe, and has taken residence in the western swamp. This concerns Horace greatly, as he knows that Mugwop is responsible for the recent death of Bartleby (who Horace considered a friend) and will likely soon attack the Widdershin tribe to regain his dominance and return the kobolds to their violent roots.

So long as the PCs have not killed any Widdershin kobolds, he will be friendly and courteous and willing to help. If the PCs have killed Widdershin kobolds, he shall be abrupt and to-the-point. He is willing to forgive mistakes the PCs have made, but if the PCs show no signs of remorse for their acts it is unlikely he will cooperate with the PCs (and if the PCs show interest in killing the kobold village, he will defend it to the death).

He does not know the specific location of Ilgrave, but he is aware that it is within the territory that the Mugwop tribe now lives in, and he also knows that Mugwop himself is intimately familiar with the area. So long as he feels the PCs are reliable, he will ask the PCs to help him deal with Mugwop--specifically by eliminating Mugwop himself. He feels this is the only option left to him after Mugwop's unwarranted attack on Bartleby. Slaying Mugwop, he believes, will cause the Mugwop tribe to collapse and most of their members to return to the Widdershin tribe.

If the PCs agree to deal with the Mugwop tribe, Horace will give them detailed information on their location as well as the number of kobolds in the tribe and a map of the area (see Part 2: The Mugwop Tribe). He will also give them a Potion of Cure Moderate Wounds and Bull's Strength to help them in their attempt. He recommends that once they deal with Mugwop himself, they search the surrounding area for the entrance. He warns that searching the surrounding area before dealing with Mugwop may be dangerous, as the kobold leader will assuredly take this as a sign of aggression and attack.

If PCs have taken a sample of Blackwater (either from Magda's House, or from a zombified Bugbear corpse) and ask Horace what it is, he comments on having heard some of the older kobold mention it before long ago when he first arrived. It seems to be a toxic substance that runs deep underneath the marsh, and brings a slow painful death to anyone who imbibes it.

5. Magda's House
This ancient termite-ridden single-story house looks as if it was whisked out of a claustrophobic cityscape and dropped harshly right in the middle of the swamp, sitting atop of a mound of dirt besides a stagnant dark green pond. Various signs hang over the door and in front of the house, many of them making such ominous exclamations as STAY AWAY, TRESPASSERS WILL BE POLYMORPHED, and WE DON'T WANT ANY. There is a small black pond filled with lilypads and toads off to the side of the house.

Magda's house is a mile and a half south-east of Bartleby's house (2 miles east of the road). Magda, otherwise known as the Witch of the Marsh, is rumored to be the oldest denizen of Widdershin Swamp. She lived in this rickity old house for as long as anyone can remember, and did not like trespassers. Recently, Bartleby has been investigating the old crone, but since his death she has been able to continue her dangerous experiments unchecked. The final result has been her death. Whenever rolling for encounters within half a mile of Magda's house, the encounter will always be 1d4 Bugbear zombies.

Additionally, if PCs inspect the pond, they find it is filled with a poisonous oil-like substance instead of water. Furthermore, all of the toads in the pond are actually undead. PCs who make a Spot check (DC: 18) will notice that the toads are behaving in a very odd way, and none of them are ribbiting. The toads do not attack, but are mindless (they move away from sources of damage and generally just sit on the lilypads all day).

If PCs knock on the door, they find that it is all ready open.

5a. Inside Magda's House
The stench of death is almost unbearable here. Countless beakers and flasks weigh down the various shelves in this room, each one labeled and filled with the preserved remains of various swampland creatures and their respective organs. Near the center of the room, a large wooden operating table with blood-slits built in to drain fluid down to the floor sits, with the remains of a rotting half-man half-frog corpse laid on top. The creature's chest cavity has been split open, and many of his internal organs have been removed and bottled for study. Nearby, several bottles sit on top of a desk filled with a black ichorous substance that is ominously labeled 'Blackwater'.

This is a single-room house with a 15 foot by 20 foot interior and a ceiling that is 8 feet high. A Search check (DC: 18) will reveal Magda's journal underneath the operating table. In it, she describes her discovery of an underground river flowing through the pond besides her house, as well as discovering the body of a strange half-frog half-man zombie. It was all ready nearly torn apart by the time it reached her, but she managed to stitch it back together and dissect it.

She has also discovered that the underground river carries with it a black oilish substance called Blackwater. This substance has the unique effect of causing any creature who is completely submerged in it for an entire day to become an animated corpse (as the spell Animate Dead). The undead seem to concern themselves with only one thing: Killing whatever they can find and dragging it back into the pond to reanimate it.

The last entry in the journal dates back to several days ago. Magda has been killed and reanimated; she now wanders the swamps much like the Bugbears, mindlessly seeking more enemies to kill and draw back to her pond.

There is over 150 gold pieces worth of alchemical supplies in the room, as well as masterwork alchemy gear.

6. Bugbear Burial Ground

Quote:
By the looks of it, the trees here have been knocked down and carted away some years ago, forming a clearing of constantly-moist muck. Headstones dot the ground here, some of them built from a tree trunk, others made from wicker, and the occasional rare one built out of actual stone. Apparently this is an primitive graveyard of some sort--and several of the graves have been recently dug up.

This area is only 500 feet south of Magda's home. There will always be 1d4 undead Bugbears here. They attack the PCs immediately. Otherwise, there is nothing of particular interest to be found here.

_____________________________

Part 2: The Mugwop Tribe
Dealing with the Mugwop tribe is inevitable if the PCs wish to find and enter Ilgrave. The only entrance is directly south of the Mugwop Tribe camp, and because of the undead who have been emerging from it recently, Mugwop considers it dangerous and has it heavily guarded.
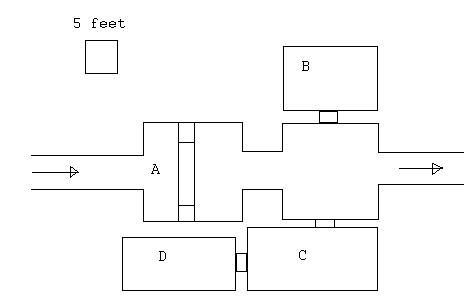
3. Mugwop Village

Quote:
Several recently erected tents built from strips of rotting cloth, blankets of vegetation, and sturdy tree branches dot the landscape of this small kobold fortification. Several kobolds circle the area on constant patrol, wielding spears and short-bows with menacing scowls and a readiness to use them.

The Mugwop Village can be found one and a half miles north-east of Bartleby's house (1 mile east from the road). PCs who have all ready encountered and attacked Mugwop kobolds (either in self-defense or as an act of aggression) will be attacked on sight (however, refer to a paragraph below this one for circumstances under which Mugwop kobolds will flee). Even if none of the kobolds escaped to return to camp, Mugwop suspects someone or something of murdering one of his kobold scouting parties, and has the camp on high alert. Otherwise, the kobolds will not immediately attack the PCs, but will insist--through gestures and prodding pokes of their spears--that the PCs immediately speak with Mugwop himself. None of the kobolds except Mugwop can speak common.

The village has fifteen level 1 Mugwop Warriors. This does not include Mugwop himself, who is a level 3 Kobold Walloper. At all times, there will be at least two kobolds located in all positions on the map marked 'X', keeping constant watch. However, each kobold has a 50% chance of being asleep (sometimes both). Other kobolds will be found sleeping in the main camp, either in tents or outside in front of the main fire. Mugwop will always be inside of his tent.

If the PCs have killed half or more of the Mugwop Warriors (and the kobolds realize this), all remaining Mugwop Warriors must make a Will save (DC: 12) or immediately flee in terror. Once one kobold screams out the alarm (this is considered a free action, and kobolds will do it immediately on their turn if they are engaging the PCs in battle) Mugwop emerges from his tent 1d4 rounds later to face the PCs alongside his warriors. Mugwop will bring his potion of Cure Moderate Wounds along with him.

Any PCs who can speak kobold or find a way to communicate with the kobolds (assuming they do not immediately attack) will find that the kobolds are in absolute terror of Mugwop's wrath. If PCs somehow manage to overcome this terror, it is plausible that they can convince some kobolds to leave the camp, so long as they promise to protect them from Mugwop's wrath. All of the Warrior kobolds know of the location of the Excavation Site, and may be willing to trade this information for promises of protection (Intimidate or Diplomacy check, DC: 18).

Quote:
Mugwop Warrior (CR 1/2) LE small Humanoid (reptilian), Level 1 Kobold Warrior Init +2; Senses darkvision 60 ft., Listen +0, Spot +0 Languages Kobold _____________________________

AC 16 (leather armor), touch 13, flatfooted 13
HP 8 (1 HD)
Fort +2, Ref +2, Will +0
_____________________________

Spd 30 ft.
Attacks Spear (+0) (1d6-1/x2), Short-Bow (+3) (1d6-1/x2)
Base Atk +1; Grp -4
_____________________________

Abilities Str: 8, Dex 14, Con 10, Int 8, Wis 9, Cha 8
Feats Dodge
Skills Survival +3
Possessions short bow, 10 arrows, spear, leather armor

3a. Mugwop's Tent

Quote:
This surprisingly large tent hosts an array of trophies, most of them the skulls and skins of various crocodiles who the kobold here have been recently hunting. A crocodile skin is laid across the floor, with a gnarled tree-stump at the center of the room serving as a makeshift table, upon which a multitude of makeshift maps have been scrawled. The room is filled with a variety of wooden spears, arrows, and short-bows.

This is Mugwop's tent. He will be located here at almost all times, along with one lietenant. There are 125 arrows here, three short-bows, 5 spears, 2 short-swords, and an unused buckler. Additionally, a Search check (DC: 18) will reveal a Cure Moderate Wounds potion hidden within a niche beneath the tree stump. Finally, the maps on Mugwop's table, while crude, detail the locations of the Widdershin Village, Bartleby's house, Magda's House, and the Excavation Site.

Quote:
Mugwop the Merciless (CR 3) LE small Humanoid (reptilian), Level 3 Kobold Walloper (see text) Init +2; Senses darkvision 60 ft., Listen +0, Spot +0 Languages Kobold, Common _____________________________

AC 17 (leather armor + buckler), touch 13, flatfooted 14
HP 23 (3 HD)
Fort +4, Ref +3, Will +1
_____________________________

Dazing Blow (Ex): Whenever a Kobold Walloper confirms a critical hit, the target is automatically dazed for the remainder of the round.
Crippling Blow (Ex): Whenever a Kobold Walloper hits a target who is dazed, the target is considered stunned for the next round.
Strike (Ex): If every attack a Kobold Walloper makes during his turn hits, they may make one additional attack at the end of their turn at their full BaB bonus with their main weapon.
Spd 30 ft.
Attacks Short-Sword (+3) (1d6+3/x2), Light Shield (+3) (1d6+3), Short-Bow (+5) (1d6+1/x2)
Base Atk +3; Grp 0
_____________________________
Abilities Str: 12, Dex 15, Con 12, Int 10, Wis 9, Cha 14
Feats Two Weapon Fighting, Improved Shield Bash
Skills Tumble +10, Survival +8, Intimidate +3
Possessions short bow, 25 arrows, short sword, breast plate, buckler, 50 gold

Kobold Wallopers are a specific prestige class for kobolds that can be found at the end of this module.

Mugwop will not be pleased with the PCs having entered his swamp, but he's interested in making a deal. He wants to overcome the Widdershin tribe and acquire leadership of all of the Widdershins Swamp kobolds; to do this, he needs to eliminate Horace. If the PCs make their desire to enter the Ilgrave area known, he is willing to allow the PCs safe passage in return for them eliminating Horace. If the PCs accomplish this task, Mugwop will make good on his word.

If the PCs walk in and simply attack Mugwop, he will fight to the bitter end. Upon slaying the kobold leader, the entire camp will descend into chaos and confusion. Mugwop's charismatic and intimidating hold was the only thing that kept the tribe together--ever since they have left Horace's tribe, the kobolds have been suffering from hunger as a result of a bad hunting seasons (this is why Mugwop attacked Bartleby--to ravage his home for food and supplies). Instead of attacking the PCs, many kobolds will simply run away in terror.

An alternative option is to sneak into Mugwop's tent (most of the kobolds aren't very observant). Killing Mugwop quietly and will cause the kobold tribe to fall apart as soon as his death is discovered (assume at least one hour).

Regardless of how the PCs deal with Mugwop, he is a considerably dangerous combatant. Mugwop will always use a shield bash every round for an extra attack, and if both his attacks hit he gets a third attack with his main-hand weapon. If Mugwop finds himself mortally wounded (reaching or dropping below 10 hit points), he will call for help. Assuming there are any left who can reach the tent, 1d4 kobold warriors will drop what they are doing and rush to his aid. Once Mugwop is slain, however, all kobolds will immediately flee in terror.

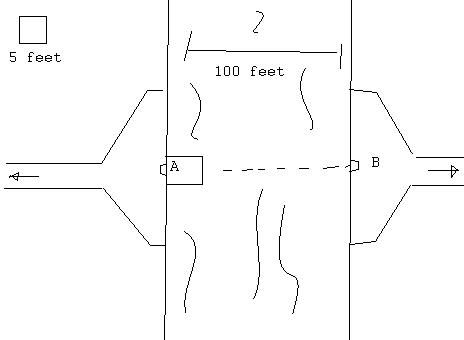
4. The Excavation Site

Quote:
Bramble and foliage cover what seems to be an ancient rocky outcropping. The head of a statue portrudes from the thick mush, its face worn away by years of weathering. Bits of stone and rock that are certainly not indigeneous to this region prod up from the rich soil, with what looks like a massive rust-smeared pipe portruding at a near 45 degree angle near the center of the sunken ruins. Drizzled in vines and other assorted vegetation, the pipe sinks into the swamp.

The Excavation Site can be found a quarter of a mile south of Mugwop Village, or one mile east of the main road. Mugwop keeps four level 1 kobold warriors (see Mugwop Village) and one of his lietenants (see below) here on guard-duty at all times. Each kobold has a 50% chance of being asleep when the PCs come across this area. If Mugwop is slain, these kobolds will abandon the site four hours later. Regardless of whether the PCs are friendly with Mugwop or not, these kobolds have been ordered to attack anyone who comes within the vicinity of the ruins without Mugwop's explicit permission. This is because Mugwop believes that agitating the well will only encourage more undead to come out. These particular kobold do not suffer from the Will save mentioned in the Mugwop Village section.

Once PCs have either slain, dealt with, or otherwise eliminated the threat of the kobold warriors, they may enter the Excavation Site without harassment.

Quote:
Mugwop's Lieutenant (CR 2) LE small Humanoid (reptilian), Level 2 Kobold Walloper (see text) Init +2; Senses darkvision 60 ft., Listen +0, Spot +0 Languages Kobold _____________________________

AC 16 (leather armor), touch 13, flatfooted 13
HP 15 (2 HD)
Fort +3, Ref +2, Will +0
_____________________________

Dazing Blow (Ex): Whenever a Kobold Walloper confirms a critical hit, the target is automatically dazed for the remainder of the round.
Spd 30 ft.
Attacks Short-Sword (+2) (1d6+2/x2), Short-Bow (+4) (1d6+2/x2)
Base Atk +2; Grp -2
_____________________________
Abilities Str: 9, Dex 14, Con 10, Int 8, Wis 9, Cha 8
Feats Dodge
Skills Tumble +10, Survival +8
Possessions short bow, 25 arrows, short sword, leather armor

4a. Inside the Excavation Site

Quote:
The pipe continues for what feels like an eternity, creeping into the darkness. Some hundred feet later, you have descended into the very bowels of the swamp. The harshly grating clang of feet against metal soon ends as you step into the site's entrance, the pipe giving way to solid blocks of granite. This room is massive, with a towering metal fan rising from the floor to the ceiling in front of you, and two metal gates on either side that lead into the darkness behind it.

Once the PCs have reached this area, they have finally made it to the entrance of Ilgrave. The next area will be detailed in Episode 2: The Excavation Site.

Part 3: Errata

Blackwater
Blackwater is a special type of water infused with negative energy. Completely submerging a corpse in Blackwater for a day causes the creature to come back as an animated corpse. They immediately begin to attack any living creatures they come across, and drag any corpses they find into the same pool they first emerged from to reanimate them as well.

If a living creature is completely submerged in Blackwater, they temporarily lose a level. This level is restored immediately when a living creature emerges from Blackwater, but while they are submerged it can not be restored by any means (not even Greater Restoration). If the creature has only one HD, it is instantly slain upon being submerged. While a creature is soaked in Blackwater, all healing effects are divided in half and all healing takes twice as long until the Blackwater is washed away (either with a small sample of blessed water or by washing the creature completely in normal water). Casting Purify Food and Drink or Bless Water on a character covered in Blackwater also nullifies its effects. Purify Food and Drink can be used to effectively 'destroy' small bodies of Blackwater.

Drinking Blackwater has the same effect as if the PC was under the effects of Mummy Rot, and can only be cured with magic.

Kobold Walloper
"GO FOR THE KNEES!"

Although not always kobolds, Kobold Wallopers are attackers who have subscribe to a fighting style best described as 'hitting-below-the-belt'. Its practioners believe that in battle, anything goes, and the person who hits hardest fastest and in the nastiest spot is going to end up being the winner. More often than not, they're proven right.

Hit Die
d10

Requirements
To qualify to become a Kobold Walloper, a character must fulfill all the following criteria.

Race
Kobolds may ignore all additional requirements, and can take Kobold Walloper as if it were a favored base class. All other non-Kobold characters must fulfill the following criteria.

Base Attack Bonus
+5

Feats
Power Attack

Class Skills
The Kobold Walloper's class skills (and the key ability for each skill) are Climb (Dex), Intimidate (Cha), Jump (Str), Listen (Wis), Sense Motive (Wis), Spot (Wis), Survival (Wis), Swim (Str), Tumble (Dex).

Skill Points at Each Level
4 + Int modifier.

Class Features
All of the following are Class Features of the Kobold Walloper.

BaB Progression
As Fighter.

Saves
As Fighter.

Weapon and Armor Proficiency
A Kobold Walloper is proficient with all simple and martial weapons, light and medium armor, and shields (but not tower shields).

Heavy Blow (Ex)
Kobold Wallopers know how to throw their punches. Whenever making a melee attack, Kobold Wallopers may add their class level to any damage they do.

Dazing Blow (Ex)
Kobold Wallopers know where to hit. At level 2, whenever they confirm a critical melee attack, their targets are automatically dazed for the rest of their turn. Enemies who are immune to daze (such as Undead and Constructs) are unaffected by this ability.

Crippling Blow (Ex)
Kobold Wallopers know how to capitalize on a good situation. At level 3, whenever they hit a dazed opponent with a melee attack, the target is immediately considered stunned for the entirety of the next round.

Strike (Ex)
When everything goes their way, Kobold Wallopers know exactly what to do. At level 3, if every melee attack they've made during their turn has hit, they may make one additional melee attack at their full BaB score with their main weapon at the end of their turn.

Oppurtunist (Ex)
At fourth level, once per round, Kobold Wallopers may make an AoO against an opponent who has been denied their Dexterity bonus to AC.

Onslaught (Ex)
Whenever a Kobold Walloper hits you, they're just setting you up for the next shot. At level 5, whenever a Kobold Walloper hits a target with a melee attack, they may add a cumulative +2 competence bonus to hit that target again during this round. This bonus is negated once the round has ended. Unlike most competence bonuses, this bonus stacks with itself; however, it never stacks with any competence bonus from any other source.

Clueless's picture
Offline
Webmonkey
Joined: 2008-06-30
The Lost City of Ilgrave

Re: maps - if you want to just toss up a good verbal description or rough sketch - I've actually got photoshop and a pretty handy map template that we can use to create something really slick if this can get polished up enough for the PSCS. Smiling

Let me finish getting dinner into me (and the kitchen clean) and I'll give the module a more through look over. Hopefully others will also take a gander at it and give their thoughts on the matter.

Kestral's picture
Offline
Namer
Joined: 2006-03-27
The Lost City of Ilgrave

So far, I like the design of the module. It seems pretty decent, and this first episode stops at a reasonable point. I have to reserve judgement on the way the portal connects to Ilgrave till at least the next episode, and that was really my biggest concern with this introductory section.

The Great Hippo's picture
Offline
Namer
Joined: 2005-07-28
The Lost City of Ilgrave

I threw this up as kind of an impulsive decision. I just got back from work and I noticed a few serious whoppers of mistakes.

So, real quick, here are some of the things I'm going to change.

  • Kobolds will have their AC adjusted for their size category bonus.
  • Mugwop will have the difficulty of his encounter toned way down. As it is now, he and his cohorts would probably own your average party. At the very least, party members will probably be dying.
  • Kolbold Walloper needs a closer look. Murderous Blow might be way too much.
  • Stat-blocks for all the kobolds. Switch out Fighter kobolds for Warrior kobolds, add at least one or two Sorceror kobolds.
  • At least one additional area/optional quest or something.

Quote:
Clueless: Re: maps - if you want to just toss up a good verbal description or rough sketch - I've actually got photoshop and a pretty handy map template that we can use to create something really slick if this can get polished up enough for the PSCS.

I'd really appreciate that. For the swamp maps, I all ready have a template that's just about done (and unlike Fenwick's Bargain Shop, it's not MSpaint), but frankly I'm not sure if I have the energy to keep polishing this and make maps for it.

Quote:
Kestral: So far, I like the design of the module. It seems pretty decent, and this first episode stops at a reasonable point. I have to reserve judgement on the way the portal connects to Ilgrave till at least the next episode, and that was really my biggest concern with this introductory section.

Completely understandable. And really, I'll be the first to say it: As the module stands right now, its incredibly bland. That's mostly because the first part is supposed to be generic enough to fit into basically any campaign you can imagine (requirements: Kobolds, swamps, dwarves!). All the weird and zany and interesting Planescape ideas I had don't start to come into play until later Episodes. Episode 2 a little bit, but really in Episode 3.

Though, really, just because its supposed to fit into any campaign doesn't mean I have to make the first episode bland. With that in mind, I plan on going over a lot of the encounters and adding more personality to them if I can.

Anyway, back to work!

Kestral's picture
Offline
Namer
Joined: 2006-03-27
The Lost City of Ilgrave

Personally, I'm OK with bland as it is used here. Really. Campaign-specific stuff shouldn't be, but general stuff should, and here, blandness is a virtue, as it is used to link a campaign from any number of possible settings, from Greyhawk, FR, Eberron and the like to PS, which itself has enough flavor to define a campaign. Besides, most low-level Clueless probably didn't have an immediate desire to make it to the Great Wheel, they'd just end up there, by accident, or when hunting after something that is behind a planar portal. This has good elements of both.

The Great Hippo's picture
Offline
Namer
Joined: 2005-07-28
The Lost City of Ilgrave

It's a fair point. I just pride myself on being stylish whenever possible.

Anyway, there's my update for tonight--I've added a lot of minor cosmetic changes (less kobold fighters, more kobold warriors, stat-blocks for just about everything, simplified crap) and a few major ones (Magda, Blackwater, Bugbear behavior, Mugwop encounter toned down).

All in all I think this episode is looking pretty good. The maps all still need to be done (I'd be forever in your debt, Clueless, if you think you could produce some stylish mini-maps for these areas--and if you think you can make one better than the Swamp map I provided, please don't hesitate), but otherwise I think this episode is, aside from a few tweaks, pretty much done.

Again, if anyone sees anything unbalanced about this, please speak up. I have experience with 3.5, but not insofar as module building and balancing encounters.

nick012000's picture
Offline
factotums
Joined: 2004-05-19
The Lost City of Ilgrave

You forgot the bit with the attack stats in Mugwop's stat block.

The Great Hippo's picture
Offline
Namer
Joined: 2005-07-28
The Lost City of Ilgrave

Quote:
nick012000 You forgot the bit with the attack stats in Mugwop's stat block.

Thanks. Fixed! Also fixed a few statistical errors with his attack rolls/damage rolls.

The Great Hippo's picture
Offline
Namer
Joined: 2005-07-28
The Lost City of Ilgrave

Quote:
Obviously, this episode isn't done yet. I've fleshed out the three major encounters (the raft encounter, Theogar's encounter, and the Water elemental encounter), but I need to finish two or three rooms and polish this up a little. And the maps are just crappy sketches.

I expect to be done polishing this and the first module up completely by the end of this week, and well on my way to Episode 3. Please, if you are at all interested, consider this a community effort. I am totally open to ideas and concepts to make this module better.

I'd especially like advice as to whether or not the ghoul-attack on the raft in the Sunken River is too much or too little. I haven't tested it out or crunched any real numbers on it.

Episode 2: The Excavation Site

Synopsis
The PCs finally arrive in the Excavation Site, hoping to find the entrance to Ilgrave. They discover that they first must contend with undead packed mineshafts, underground rivers of Blackwater, pissed off dwarf spirits, and more. This module begins with PCs in the Excavation Site entrance, and ends once they manage to activate the portal and step through, thereby entering the city of Ilgrave.

Hooks
If you skipped Episode 1: Widdershins Swamp, the same hooks that started that campaign still apply here. PCs could be hired by a wealthy treasure hunter who wants to find the legendary city of Ilgrave, the dwarves could be interested in learning what became of their expedition, or perhaps the PCs just want a chance to cash in on what they see as easy money (raiding a dead city for its loot).

Background
A few centuries ago, this was contested territory between the dwarves and the kobolds. Nobody but the dwarves actually remembers this, but they fought a bloody war with the kobolds for the right to mine these marshes, and did it so well that the Widdershin tribe are still terrified of going underground.

Shortly after the dwarves mined the hell out of the ground here, they came across a buried planar fold. Through it, the dwarves discovered a city in a demiplane. So they did what any entrepeneurs would do: Commenced trade. For several decades, the dwarves had a very lucrative trading agreement with the city of Ilgrave, exchanging their stonecutting skills and material for the city's considerable wealth.

Then one day the portal stopped working.

The dwarves waited and waited. They were patient enough to wait for an entire century, stripping the mine of every last bit of ore in the process. Once there was nothing left to mine and it was becoming clear the portal wouldn't be opening anymore, the dwarves left the base without another word.

However, the portal's recently reopened. Undead have been shambling their way out, as well as some sort of strange horrible liquid called Blackwater (see Episode 1, under Part 3: Errata). With the sudden spike in activity, the dwarves sent in an expedition team to see if Ilgrave was interested in trading again... and the expedition team never came back.

Part 1: The Upper Mineshaft
For every hour the PCs spend here, there's a 10% chance that they'll encounter 1d6+1 zombies (roll 1d4 to determine the type; 1 through 3 is human, while 4 are dwarves). The zombies attack on sight and drag anything they've killed down into the Sunken River (area 2).

1a. The Entryway

Quote:
This is a dead place. By the layer of dust and the thickness of cobwebs that drench every inch of it, you may be the first living visitors it has had for many years. And yet it is obvious that this was not always a tomb... Refuse covers the floor, including bits and pieces of civilization. The haft of a broken pick, a miner's helm, a shattered lantern...

In front of you, a towering fan sits behind a metal cage, stretching up from the top of the ceiling down to the bottom of the floor. On either side are checking gates where miners would enter the mine proper, stepping past the ventilation fan and into the darkness beyond. Once, the many broken lanterns mounted along the granite-brick wall would illuminate this place in an amber glow, but they have long since become dead. Only the light you provide can guide the way.

The giant fan was once used for ventilation purposes. Upon each slanted metal blade is scribed a magic rune of repulsion; two propellers are layered on top of one another, and when the fans are set to spinning in opposite directions the runes interact to create a powerful gust of wind. With only a little adjustment, the fans could be reversed to send that same gust of wind out through the entrance and plowing through any invaders who happened inside... But this is moot, since the fan no longer works. The runes have long since rusted away.

Either of the gates were once lockable, but have since been broken by the expedition team who came down here to investigate the portal activity. There's nothing otherwise interesting or useful in this room.

1b. The Foreman's Office

Quote:
A stifling sea of crumbling yellow paperwork covers every available space in this room, with shelves packed full of an over-abundance of books and ledgers. Water damage seems to have rendered every document in here illegible, and the books themselves are nothing more than pages of mush. A large stone desk sits squarely in the middle of the room, with a shattered chair besides it and a well-worn leather-brown book closed and buckled at the center.

All the books here are completely illegible and useless from water-damage except for the book on the desk. Most of the contents have been destroyed, but anyone who can find a way to read Dwarvish discovers that this was once a dwarven mine where various important ores were extracted daily. The dates indicate that the last time this mine saw any use was over a century and a half ago. Additionally, there are references in the book to transactions and exchanges made with a person by the name of 'Renolds'. Apparently, the dwarves were trading stone-cutting services with him in exchange for money, food, water, and mining equipment. Just where these transactions were taking place is not mentioned.

1c. The Supply Closet

Quote:

1d. The Living Quarters

Quote:

2. The Sunken River

Quote:
The narrow tunnel breaks open into a massive chamber that rumbles with the roar of a flowing underground river. The ceiling towers above you some twenty feet, with the rocky uneven ground and walls here still baring evidence of the picks which carved this niche besides the water, forming a riverbank.

The river itself is an ominous black, oily and thick. It flows slowly, pouring itself through the hollowed out chamber in front of you like a slinking sludge. It is over a hundred feet in width, and spanning it is a heavy-linked metal chain that spans both sides. On the opposite end, the chain is attached to an iron post on the river's east bank. On your side, it is attached to an iron-reinforced raft.

The vessel looks sturdy and servicable, although it is a little squat. It is secured to this side of the bank by means of several ropes looped around wooden posts, and the chain which attaches to it is rolled up in a crank. Apparently, by turning the crank, you feed the chain into and under the raft, dragging it across the river.

As soon as you step forward, a horrible rotting stench assaults your senses.

When they first began to excavate the mine, the dwarves discovered an underground river. They built a chain-drawn raft to drag their equipment from one side to the other. The raft is 10x10 feet in size.

The room's sheer stench (from the countless undead; see below) is treated as identical to a Ghast's stench ability (Fortitude save, DC 15, or be sickened for 1d6+4 minutes; a save means ignoring the stench for 24 hours). The river has been poisoned by the portal, and now is considered Blackwater (see Episode 1, Part 3: Errata). Additionally, this is where the undead have been emerging from and moving to attack the swamp. Bodies are being carried by the current out of the portal (see Part 2: Portal to Ilgrave) to here, where many become animated and crawl their way out. The river is teaming with undead, including a special breed of ghouls and ghasts who have found a new creative way to kill their prey with substantially less risk.

PCs who fall into the pool of water must make a Swim check (DC: 15) or be dragged by the current southward (5 feet for every point they failed the roll by). PCs who are dragged to the point where the map ends (50 feet from the center) reach the end of the cavern, and are pulled forcibly underwater, where they must continue to fight the current back to open air or drown. Additionally, there is a 50% chance each round the PCs are in the water that they suffer an attack from the undead, and a 10% chance that this undead is a ghast. Otherwise, it is a ghoul. PCs can attack back if they wish, but because of the strong moving current, an attacking ghoul or ghast will usually only make one attack and retreat. Killing the undead will accomplish nothing unless the PCs can manage to kill over 50 (at which point the attacks stop).

PCs can attempt to scale the chain (Climb check, DC 18, moving at half their normal move-rate, with failure meaning falling into the water) or get atop of the raft and turn the crank. Additional PCs may help drag the craft along by pulling on the chain with their bare hands. Any PC manning the raft's crank can move it at a rate of 4x their strength modifier in feet every round (meaning a PC with a +4 strength modifier can move it 24 feet in a single round). PCs helping by dragging the chain with their bare hands add their strength modifier in feet every round (meaning a PC with a strength modifier of +3 adds 3 feet to this total moved per round). Moving the raft by these means is a full round action.

When the front end of the raft reaches or passes the half-way point (up to 50 feet across), the undead near the center of the river become aware of their presence and begin to attack. Every round after this point, roll 1d4. This many ghouls enter the battle, attempting to pull themselves up atop of the raft. There is an additional 50% chance that one ghast will attempt to pull itself up.

When the undead pull themselves up, they do so by making a move-action; this move-action provokes an attack of oppurtunity. When pulling themselves up into an occupied square, the undead immediately use their standard action to attempt and grapple their target with their paralyzing touch. If they succeed, they spend their next round using a full round action to drag their target into the Blackwater with them, where they release them (usually resulting in drowning). If the undead fails to successfully grapple an opponent, it dives back into the water the next round.

PCs who are attempting to climb the chain have a 50% chance of suffering the same type of attack once they reach the half-way point. There is a 10% chance that this attacker will be a ghast; otherwise, a ghoul attempts to grapple the PC and drag them off the chain. The PC is considered flat-footed for the purposes of this roll.

Once the PCs reach the opposite shore, the attacks stop. However, every hour the PCs spend on either shore comes with a 20% chance that 1d6+1 zombies (roll 1d4 to determine the type; 1 through 3 is human, while 4 are dwarves) will emerge from the water and attack. The zombies drag anything they've killed down into the Sunken River.

Part 2: The Portal to Ilgrave
Deeper inside of the mines, the PCs will discover the dwarven mineshafts. Most of them have collapsed, and many are inaccessible because of the rising flow of Blackwater (which is teaming with ghasts and ghouls), but the most important portion of the excavation (the portal to Ilgrave) can still be reached.

Here, the zombies are more intense. Every hour, there is a 20% chance that 1d6+2 zombies (roll 1d4 to determine the type; 1 through 3 is human, while 4 are dwarves) will appear and attack the PCs. The zombies drag anything they've killed into area 2 (Part 1), the Sunken River.

3. The Lower Mineshafts

Quote:
The quiet of the grave resides here; darkness is omnipresent, nearly stifling as it suffuses every corner and every niche. The distant sound of shuffling can be heard through these corridors, as well as the echoing rumble of bedrock that lurks precariously above your head. Iron reinforced beams flank either side--the ingenuity that built them has let them last centuries after their creators have abandoned this place to the rot of the grave.

A corridor stretches out before you, sinking deeper into the darkness of the mine.

3a. The Chapel

Quote:
This small cloistered corner of the mines seems to have a certain serenity to it; through the thick granite walls, you can not hear the desperate sound of shifting, crushing rock overhead, nor the scrambling shuffle of the dead through the mine's halls. Instead, there is only a persuasive sense of peace and calmness here.

Three statues stand at the back of the room, each of a stoic dwarf. One is of a mage, another of a fighter, and the last of a cleric. They show the burden of time--the warrior is missing an arm, the mage has began to crumble--but they are still clearly recognizable. Before them, a circular pool of clear water set in a brass basin 6 feet in diameter rests, 2 feet deep.

In front of the basin is a small altar set out for a dwarven hero. Carved in the stone coffin is the image of a dwarven warrior sleeping in respite, his axe still clutched in his hands. At the foot of the sarcophagi is a real dwarven corpse, his mummified body still clad in shining breast-plate and a horned helm. Within both hands he clutches a warhammer that rests between his boots, and at his feet are reverently laid 15 separate skulls. Script has been scrawled around the ground around him, and as you approach it, it gleams with a golden light.

Atop of the coffin is a page of crinkled yellow paper weighted down with a small rock.

This is the final resting place of Theogar, one of the seven brothers who was originally sent upon an expedition mission to the excavation site. The skulls at his feet are the zombies he killed before he himself fell to his wounds.

His brothers were unable to reach him in time, and wishing to continue on their quest, placed him here at the foot of a dwarven hero. He is wearing masterwork breastplate, a light iron shield, and wielding a warhammer of disruption.

If anyone can read dwarven, they may make an Intelligence check to decipher the runes (DC: 10). Additionally, a Decipher Script roll (DC: 25, 10 if the PC knows dwarven) will also reveal the message. It says (somewhat unclearly): "Here rests our beloved brother, Theogar, slayer of the Damned. Disturb him not lest you wake his wrath."

If the PCs attempt to take Theogar's breastplate, battle-axe, or physically disturb the body (moving or searching it), Theogar immediately awakens and attacks the PCs. Read the following text:

Quote:
As if a bolt of lightning was crackling through it, the corpse suddenly shudders. With a spasm, its eyes fly open and its body lurches up to its feet, its hammer swinging about in the position of battle. With a dark-throated roar, the corpse bellows out a war-cry and attacks!

Quote:
Theogar the Corpse-Breaker (CR 3) CN medium humanoid (Undead), Level 5 Fighter Init +1; Senses darkvision 60 ft., Listen +0, Spot +0 Languages None _____________________________

AC 16 (breast plate), touch 10, flatfooted 16
HP 36 (5 HD)
Fort +4, Ref +1, Will +1
_____________________________

Spd 30 ft.
Attacks Warhammer (+9) (1d8+6/x3)
Base Atk +5; Grp +7
_____________________________
Abilities Str: 19, Dex 10, Con -, Int -, Wis 10, Cha 10
Feats Weapon Focus (Warhammer), Weapon Specialization (Warhammer), Dodge, Mobility, Spring Attack
Skills None
Possessions masterwork breastplate, warhammer of disruption, light iron shield

For a party that isn't ready, Theogar can be a very dangerous encounter. Being mindless undead, he immediately attacks the nearest target who has disturbed his rest and continues to attack until he is dead. Once the PCs have destroyed him, his body is reduced to dust.

Mages who make a successful Spellcraft check (DC: 28) and Rogues who make a successful Search check (DC: 25) will notice that the body is magically trapped.

The note atop of the sarcophagus reads the following:

Quote:
To Whom It May Concern:

We have ventured deep into these mines to seek the source of the undead. In doing so, we have lost Theogar, our beloved brother. We leave him now here in the care of this chapel. May those who disturb his rest until we return to bury him feel the full brunt of his wrath.

We have discovered the entrance to Ilgrave. Much to my dismay, the only way in may not be a way out. I have no way of knowing if we shall be able to return once we step through the doorway... We may have to find another way back, once we do.

-Thenros

No zombies (besides Theogar) will attack within this room. The water inside of the copper basin is pure, and under the effects of a bless water spell. When the water is removed, it will refill itself after one day. Inside the sarcophagus are the remains of an ancient dwarven religious leader who was brought to the mine-shaft to consecrate this ground. There is 250 gold pieces of jewelry on his person.

If the basin is taken out of this area, it immediately loses its power.

3b. The Deep Mines

Quote:
Within the center of this room, a 10 foot diameter hole has been carefully cut, with a small iron crane with an attached pulley and chain set besides it. Several upended mining carts surround the scene, with the stench of death rising up from the hole itself.

This area was the entrance to the deep mines, where the dwarves started mining shortly after stripping this area of its ore. However, if the PCs look down the hole, they find that after ten feet it is cut off by a pool of Blackwater. The deep mines have been completely flooded by the Sunken River in area 2, which has recently broken through one of the lower chambers and washed through the once-dry mineshafts.

PCs can sink into the tunnel if they really want to, but suffer the effects of being submerged in Blackwater and countless attacks from the Undead who ended up in these mineshafts instead of in the Sunken River area. There is nothing of interest in this area, and PCs who go down into them are likely to meet grim ends unless they get out quickly.

3c. The Portal to Ilgrave

Quote:
The corridor into this room sinks considerably, with oily black water soon rising up to suspiciously near your waist. The sound of flowing water thunder thunders here, where a constant gentle undertow tugs at your ankles as the liquid flows to the various niches and cracks throughout the room. Once again, the stench in this room is obscenely nauseating.

This chamber is larger than the others. It has been meticulously carved out into a 15 foot tall area, with layered bricks reinforcing the walls along its sides. At the center of the room stands a metal ring placed upon its side, erected up and portruding from the flow of water. The surface is a dark, metallic green, with indecipherable script scrawled along its rim. Overall, the ring is approximately 12 feet in diameter, and is apparently bolted into the ground. Through the ring, nothing can be seen--a sheet of impenetrable black seems to envelope the space within it.

As you enter this room, you hear a sibilant hiss as something brushes across your feet; then, suddenly, you are under attack.

This is the portal the dwarves used to trade with Ilgrave. Originally, they only discovered a planar 'fold' that allowed one to step into Ilgrave and vice versa, but after discussion the city built this ring which allowed Ilgrave to restrict access to and from the city. So long as the ring is present, it can be used to shut down the fold in space.

Recently, the ring has been malfunctioning, however. The portal was never completely successful in closing off the fold, and the constant influx of small amounts of Blackwater wore away at the enchantments until they began to break. Now, large influxes of Blackwater along with corpses from Ilgrave are flowing into the room and sinking through the secondary entrance to the Deep Mines contained here (on the north end, behind the portal), before being carried by the flow of water to the Sunken River (area 2).

A medium water elemental has recently taken up residence in this cavern. Both it and the PCs are considered touching water (Blackwater) for the purposes of Water Mastery, and not touching ground. However, the water is not deep enough for the water elemental to employ its Vortex attack. The water elemental appears in the shape of a serpent as it attacks the PCs. For determining the effects of Blackwater on the PCs, the PCs are only considered soaked, not submerged.

Once the PCs slay the water elemental, they may investigate the ring. Sticking objects through the ring causes them to be teleported through to Ilgrave. PCs who stick their head in can see nothing but blackness (they aren't actually teleported until they step completely through). Once PCs step through, they are instantly teleported to Ilgrave. You should read the following passage to any PC who steps through the portal. Incase PCs step through individually, it's recommended you prepare slips of paper with the following message printed on it to show to each PC as they enter.

Quote:
For a moment, you feel a sharp tugging sensation that seems to pull you in every direction at once. Then you are underwater.

PCs are immediately thrown to the other side of the fold, where Blackwater has completely flooded the area. PCs cannot return through the portal, as only non-living things can pass back through the portal on Ilgrave's side.

Once the PCs step through the portal, they have successfully reached the city of Ilgrave. The next area will be described in Episode 3: The City of Ilgrave.

The Great Hippo's picture
Offline
Namer
Joined: 2005-07-28
The Lost City of Ilgrave

A few quick notes!

  • The raft encounter doesn't have any really good system on how to deal with Cleric turning. I think this whole encounter needs a revision. I want it to be fun and simple but nail-bitingly suspenseful. I'd lvoe to hear some suggestions about alternate rules to handle this situation, since I don't think mine is working too well.
  • What I need is an elegant way to get the PCs to go through this portal and not be able to come back. Even the insanely paranoid PCs. What I have now is kind of a cheap shot--living things can go through one way, but not the other. Of course, this has the hilarious consequence of leaving the PCs with the choice of becoming undead to escape (I'd love to give them that option, just to see if they take it).
  • I think there's definitely room for one or two more encounters, especially with Theogar's encounter being purely optional and only if the PCs think desecrating corpses against the wishes of the good guys is totally okay. So I want to expand the mine shafts, but I'm having a hard time of thinknig of how.
  • I know its not planar yet! But don't worry, as soon as we get into Ilgrave, things go crazy! My biggest concern is balancing the risk of overwhelming new PCs with Planescapian terminology and simultaneously feeding experienced PCs who are hungry for it. I've got some very interesting ideas in mind, but I definitely want to hear yours.
Orroloth's picture
Offline
Namer
Joined: 2004-10-23
The Lost City of Ilgrave

Aha! Kytos will definitely have to latch his hooks into this!

I do feel that some of the Kobold Walloper abilities are overpowered (Heavy Blow? Eeek. Dazing and Crippling Blow? Double Eeek!) - especially if you consider a PC built with that PrC - , but all in all, stats aren't that important when it comes to adventures (in fact, I am of the opinion that they should be added by the individual DMs).

Planescape, Dungeons & Dragons, their logos, Wizards of the Coast, and the Wizards of the Coast logo are ©2008, Wizards of the Coast, a subsidiary of Hasbro Inc. and used with permission.